Sunday, October 11, 2015

Boo Pennant : Deflecto Sign Tags


Every Holiday worth celebrating needs a little décor. With the functional and versatile Sign Tags w/Wet Erase Marker you can make a pennant that will change with the seasons. Sign Tags are cutable and washable perfect to rewrite and re-purpose for any occasion.


Here is what you need:
Ribbons : May Arts
Halloween Paper: DCWV
3D White Foam Square • 1/4 in
White Colored Pencil
Scissors
¼  inch Hole Punch

Here is what you do:


11.       Mark desired pennant shape and hole location with white color pencil.
22.      Cut along mark lines.
33.       Using White Marker highlight around edges of pennant.
44.      Punch holes as marked.


55.       Cut letter from Halloween paper and adhere them to center of pennant with 3D foam Squares.
66.       Tie pennants together with ribbon.

When the seasons change simply peel off the letters, change your ribbons and message and you are set to go! Love a quick change sign and these will last and last!

Happy Crafting!


This is a sponsored post. As a member of the Deflecto Design Team I have been provided product in exchange for my creative ideas, views and opinions

Wednesday, September 16, 2015

Hair Affirmations with Deflecto

Back to school brings the morning routine back into full gear. I don't know about you but with my girls that means dealing with bad hair days. You know those mornings are inevitable "mom, I can't go to school my hair just ...". Well ladies and gents here is a little hair affirmation that should be read every morning to eliminate the morning whine. "There are NO bad hair days ONLY opportunities to Accessories" say it with me and believe it "There are NO bad hair days ONLY opportunities to Accessories". Ah don't you already feel more relaxed thinking about doing your hair tomorrow?


Here is what you need:
Printed "Hair Affirmation" 5x7
Ribbon to make hair bow or just your favorite clips 
Bow Supplies:
Ribbon (I used...May Arts 1.5 inch chevron and 7/8 Inch Grosgrain Horizontal Stripes)
hot glue gun and glue
silicon mat (keeps the hot glue where it needs to be..aka not on your kitchen table or counter)
hair clip
scissors

Here is all you have to do:
1. Load printed "Hair Affirmation" into Beveled Edge Frame 5"x7" Item Number: 799593CR


2. Fold  5/8 inch White Elastic Ribbon in half and tie a knot. Wrap around frame.


3. Create bow or skip to step 7.  
4. Fold ribbon in staggered loops as illustrated.  The wider the loops the bigger your bow...so if you are anticipating a REALLY bad hair day go big! I recommend starting with 3 -inch loops.

5. Using needle and thread stitch along center of loops. Pull thread tight and wrap thread around center of bow and tie off with a knot.  On a 3 inch piece of matching ribbon tie knot in center.

6. Wrap knotted ribbon around bow with knot facing at center of front and hot glue in place. Trim any excess ribbon and glue clip in place (I used a combo clip, I like to clip it to an elastic headband.)


7.  Clip bows to elastic ribbon on frame. Now you are set and ready for your next morning routine.

Happy Crafting and may the Accessories be always in your favor!


Tuesday, September 1, 2015

Sundae Candle Pedestal: Etchall


I love making something old new again. I was cleaning out my cupboards of those items that got shoved to the back because they never get used and came across this little sundae dish. I haven't used it in like 5 years so clearly it was a crucial space holder in my kitchen for far too long. So here is what I did to change it up...

Here's what you need:

etchall dip 'n etch liquid
Enamels Gloss Finish Acrylic Paint 4130E Sterling Silver
TintIT, Jade
sundae dish

optional: oven


1. Clean and dry Sundae dish.


2. Pour etchall dip 'n etch liquid into dish. Let set for 15 minutes, poor etchall liquid back into container and wash dish.


Etching the inside of the dish gives the glass tooth to hold the paint in the next step.


3. In a disposable container mix a little water in with your Acrylic paint and pour paint into dish. Roll the dish around to get a nice even coverage.

4. Turn dish right side down and let dry for 1 hour, paint will drip place on a paper bag to catch drips. Place in cool oven for 30 minutes as directed on paint. Carefully pull from oven and let cool.


5. Spray with TintIt for a shear coat of color. Let dry.


Once a you place pillar candle on this sweet dish you will start digging deeper in your cupboards to see what other pieces you can etch and paint to match.

Happy Crafting!

Monday, August 3, 2015

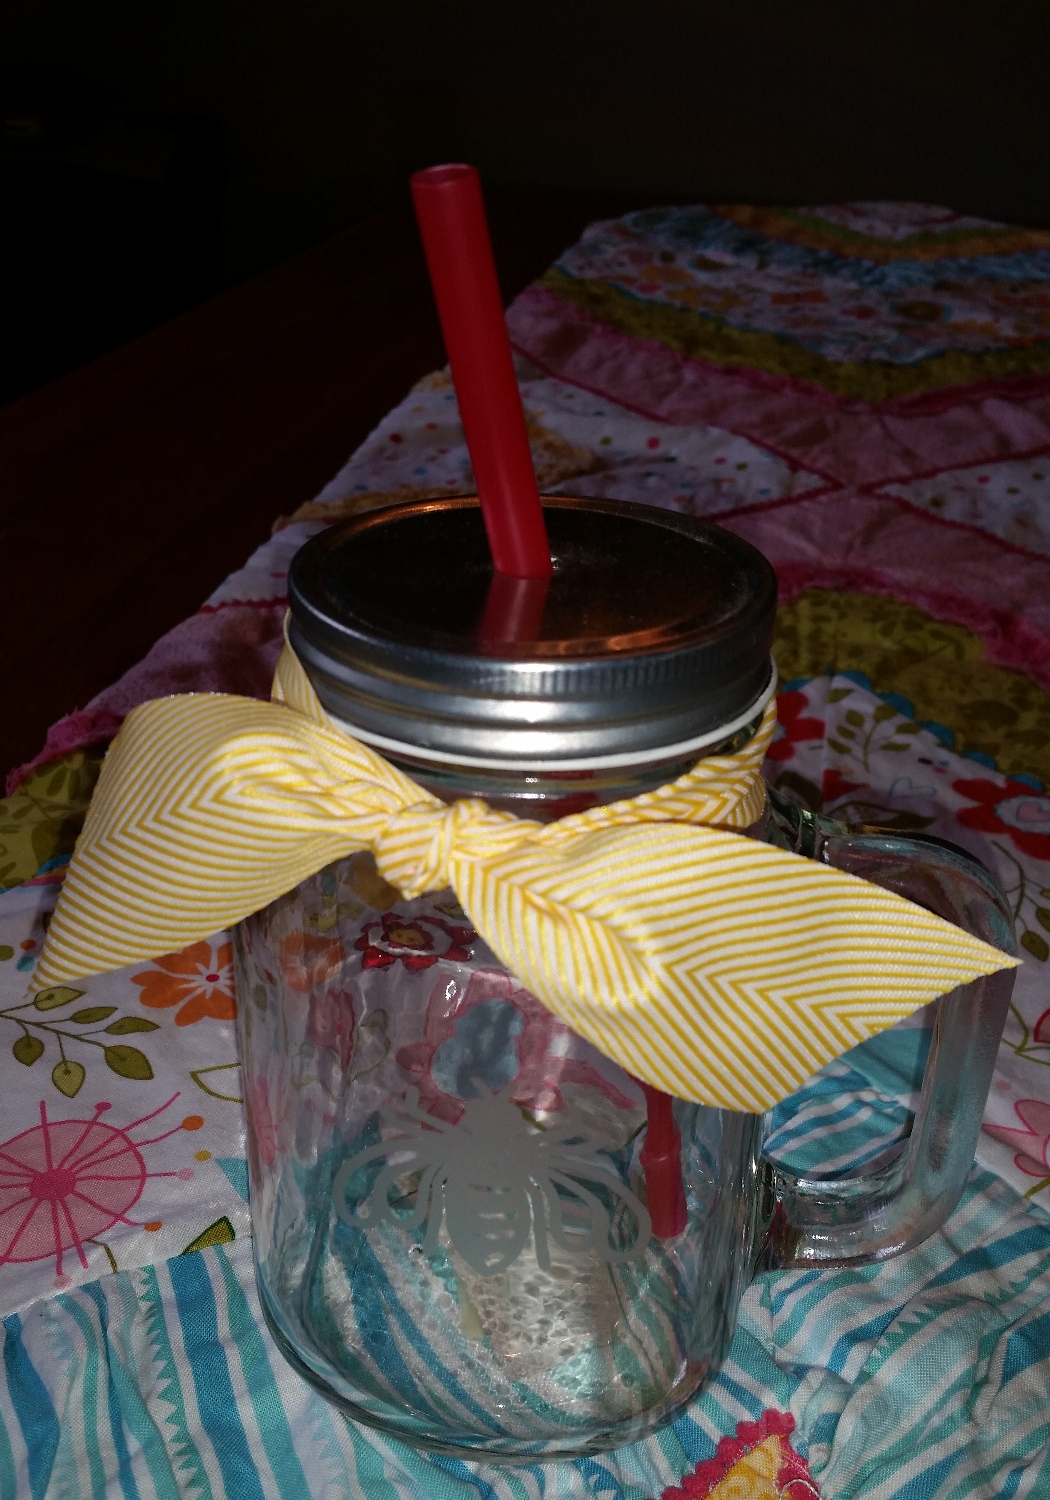
gotta Bee etchall


Perfect for a hot summer day. This lidded jar with straw can be filled with treats and gifted or just loaded up with your favorite cool beverage. Following a few simple step you can have a set of fabulous bee jars.


Here is what you need:

etchall Detail Pick Tool
etchall squeegee
digital cutter
jar
tongue depressor (not required but kinda handy.)
ribbon


Here is what you do:
  1. Cut bee in etchall® etchmask with electronic cutter. This particular bee is a Cricut design.
  2. Remove all excess pieces of etchall® etchmask with etchall Detail Pick Tool to create desired design. 
  3. Apply etchmask™ transfer sheets over slick side of etchall® etchmask. Remove paper backing.
  4. Apply etchall® etchmask sticky side down on jar. Smooth on flat side of jar. I left a tongue depressor on the sticky side of the etchall® etchmask edge to control runoff and for easy peeling when the time comes.
 
5. Apply etchall® etching crème liberally over design. Let stand as directed on packaging.


6. Scrap off etchall® etching crème and return as much as you can back to the jar. (love that this magic creme is reusable!) Peel mask away and rinse remaining etchall® etching crème from glass.


7. This is the point I always stop and stare. Love the magic of etching...science = art (you can choose to skip step 7 and move right on to 8.)


8. Embellish you jar with a lovely piece of ribbon. I used May Arts 1.5 Inch Twill / Chevron Stripes Ribbon in yellow.

happy crafting! <3 Jennifer

Wednesday, July 1, 2015

UP in my Treehouse...MayArts/Stampendous Hop


May Arts is offering a fantastic prize $25 at RibbonResource.com so head over and check out all the details on MayArts.com:


As summer is so busy I am keeping it simple. This stamp feels like a lazy summer day... I stamped it on a piece of filter paper and colored it with water color pencils. The translucent nature of the filter paper is fun to play with so I layered it over  newsprint style paper. My card base is a chalkboard paper that I distressed with a sanding block. Tying the burlap and velvet ric rac ribbons is a fun pop of color and texture.

Supplies:

3/8 Inch Velvet Ric Rac Ribbon: WR14 - RED

Stampedous - Tree House

Stazon - Gray
filter paper
water color pencils
water brush
newprint paper
adhesive


Thanks for stopping by and don't forget to visit ALL of my talented Ribbonista Sisters following the links below.
Monday

Tuesday

Wednesday

Thursday

Friday


Thursday, April 23, 2015

nautical baby block


Welcome Baby Hoppers! Such a fun reason to trek from blog to blog isn't it? As you are probably an experienced blog traveler you know that May Arts hops ALWAYS come with fantastic opportunities to win ribbon...this hop is no different. Be sure to comment on the May Arts side for your chance to win baby ribbons https://www.mayarts.com/browse/industries/baby/  

For this hop I wanted to make something fun. I have to say I had a lot of fun choosing what quilting design I was going to do on each panel, you can go simple or super fancy. The added ribbon makes a great handle for little hands to hold and play with.


Here is what you need:

7/8 Inch Grosgrain Horizontal Stripes, 522-78 

Fabric, I used Anna Griffin: True Blue 

Thread, I used a thicker 12wt for impact

Batting

Basic Sewing supplies: Sewing machine, scissors, rotary cutting supplies

Here's How:


 1. Cut 6 squares and quilt a layer of batting to back with the 12wt thread. 

2. Trim edges to square and pin looped ribbon in place.


3. Sew 4 squares in a row with a 1/2 inch seam...starting  and stopping 1/2 inch from edge of fabric. L

4. Sew top and bottom in place leaving opening on one side to turn right side out.
5. Turn right side out and fill with fiberfill.
6. Hand sew opening closed.
7. Hand to your little munckin' for hours of fun.


This was a fun quick project , I may have to make a few more for shower gifts.
Happy SEWING!
Thanks for stopping by and enjoy your journey.

 
Thursday

Friday